Google vind iets .. probeer dat dan maar eens recht te zetten

Google zegt dat deze site mogelijk gehacked is ..

en laat dat nu eens niet het geval zijn

Deze site is mogelijk gehackt., zegt Google. Ja maar …. en dan ga je zoeken, testen en je weet me god niet waar je moet zoeken. Want .. tsja je krijgt wel een link, maar als je link naar de weblog sectie van deze site verwijst dan staan daar een x aantal berichten onder met wat ‘technisch’ karakter, maar dat is het dan wel .. heb dus totaal geen idee waar ik moet zoeken of wel stukje code wat ik getikt hebt een trigger is voor Alphabet’s Google ..

Mocht je iets vreemds bemerken, ik hoor het wel, tot die tijd blijven we ons afvragen wat er mis zou zijn .. (Ik heb het theme is al veranderd .. ) dus een theme hack sluit ik even uit


update: Na eerst 1 pagina aan te merken als iets wat niet goed zou zijn, vond Google dat dan de gehele site wel even geïnfecteerd was. Maar echte duiding wat er dan mis is: nope ..

Dus ..

update: diep in de spelonken van dit weblog was wel wat aan de hand met wat gemodificeerde bestanden maar zou niet zo 1-2-3 kunnen zien of dat Google zou signaleren .. maar goed , WordPress maar even waar nodig geheel verwijderd en opnieuw geïnstalleerd zodat er geen ‘historie’ van oude bestanden meer aanwezig was.

Tevens een aantal folders die niet meer gebruikt werden ook verwijderd zodat dat ook geen belemmering zou kunnen geven ..Zie hier . site is weer ok .. zegt Google dan ;)

Edgemax Lite with local domain issues through VPN

I was using a dnsmasq DHCP/DNS server but that version broke due to an software update where it was running. So I changed towards the DHCP and DNS of Ubiquity Edgemax Lite

The issue I had was that local domainnames (FQDN) could not be looked up by its name but only through IP. In the old situation where not the router was the DNS server it was working but in the new environment not. I changed the DNS server to the correct local IP for the local hostnames, but no success.

Than I found a hint in a forum

open a SSH session towards the Edgemax

configure
show service dns

forwarding {
cache-size 400
listen-on eth1
listen-on eth2
name-server 10.1.1.1
name-server 8.8.8.8
name-server 8.8.4.4
system
}

Above is the non working environment for VPN (for all other situations it was ok)

the local name-server was defined but it was probably not available through L2TP VPN

The solution was to add

options listen-address=10.1.1.1 with this command:
configure
set service dns forwarding options "listen-address=x.x.x.x"
commit
save

where x.x.x.x is the IP of the router. It should be the IP address that PPTP/L2TP is returning to the clients for DNS server

Apple, hoe zit dat nu als ik een app Koop / Download?

Apple,

Sinds kort krijg ik het volgende te lezen als ik een App koop uit de Apple Store:

“Bevestiging”

“Ik ben me ervan bewust dat ik de aankoop niet meer kan annuleren als ik deze app download binnen veertien dagen nadat ik op ‘Koop’ heb getikt.

Euh ..

Bedoel je hier nu dat ik, als ik op koop tik en de app download de app niet meer mag annuleren?

Bedoel je dat ik 14 dagen de tijd heb om de app eventueel te downloaden en als ik dat doe dat ik het dan niet meer kan annuleren?

Bedoel je hier dat als ik druk op koop dat ik het dan wel mag?

Of bedoel je gewoon dat ik 14 dagen de tijd heb om te annuleren wanneer ik op koop heb gedrukt en de app heb gedownload?


Dear D-Link, Alpha Networks, Realtek .. I own a DWA-192 and I get satisfied

Update 15-11-2016

I have added extra options to the SMB configuration of Openmediavault

In a last test I got almost 5.5 tot 5.75MB/s downloading data from my NAS to my Win10 notebook.

By adding these ‘options’ my speed improved with almost 600% from 5MB/s to 30MB/s

max protocol = SMB2
max xmit = 65535
socket options = TCP_NODELAY IPTOS_LOWDELAY SO_SNDBUF=65535 SO_RCVBUF=65535
read raw = yes
write raw = yes
max connections = 65535
max open files = 65535


Update 21-08

I am getting (its wierd) more satisfied, now the Wireless is stable and I do random tests

First of all I was testing PC Windows 10 –> Debian Linux, so a write action, my rant was about the write speed. But actually I think I cannot be complaining a lot when I achieve 20 to 30MB/s  write speed .. ? can I?

Today I tested a read speed from NAS (Debian with OMV, (OpenMediaVault)) and here I get speeds between 40 and 45MB/s ..  so .. although I would like to have faster write speeds, the read speed is showing expected speeds.. .


original rant  below;-)

…..

First of all .. I am geek, like to test, read manuals (not user manuals but engineer manuals or technical manuals) to find and read about settings to see how they can be finetuned for optimal results.

Maybe it’s due to myself, but why is there not a decent manual for the DWA-192? settings explained? best settings used … documentation is dramatic.

Last week I bought a DWA-192. It’s being used in The Netherlands under Windows 10 and I am testing towards a HP Microserver running VMWARE with a host running Debian 8. Normal speeds on Gigabit copper wire are around 78 to 80MB/s

The speed advertised for the DWA-192 within Windows 10 is between 1.1 and 1.3Gbit/s with this I expect at least speeds between 300 and 500mbit/s, but I achieve much lower (180 / 220mbit/s)

update (one day later): due to just wait .. and maybe time of test I see better results. Speed is improved towards 250 to 300 mbit/s

My AP environment consists of 3 APS’s

  1. Ubiquity AC LR in the attic
  2. Ubiquity AC LR 1st floor
  3. Ubiquity AC Pro living room (the DWA-192 is connected to this one). I know that I get much lower speeds when using 1 or 2 but I am using it at 3 .. and expect the full potential ..

The notebook is 4 meters next to the Ubiquity AC Pro. I have a good wireless connection (Images will follow) due to the wireless connection speeds of 1.1 and 1.3Gbit/s

Dear D-Link, please request your engineers at Alpha Networks that they will contact Realtek to see how interoperability between AP’s can be improved. I really like to help to test, things I did many years.

There are a few things:

  • the advanced settings in the network driver are not described, So it is a needle in a haystack to see what are the best settings (I did test a lot of settings and see various results
  • Enable / Disable QoS shows dramatic changes in performance
  • default using the WLAN on auto rather than choosing 802.11ac or a combination of both is causing the DWA-192 not to connect to its max speed, only Wifi speeds: 450 or 600 (if lucky), forcing the device on 802.11ac/n/a is showing higher speeds ..
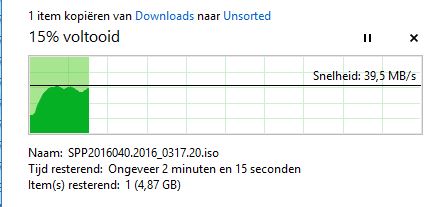
  • Windows SMB copy shows around 20 to 30MB/s at a connection speed of 1.3Gbit/s this is ‘dramatic’ I am expecting here 45 to 60MB/s
  • Update: SMB is also improved to max 40MB/s

smbcopy


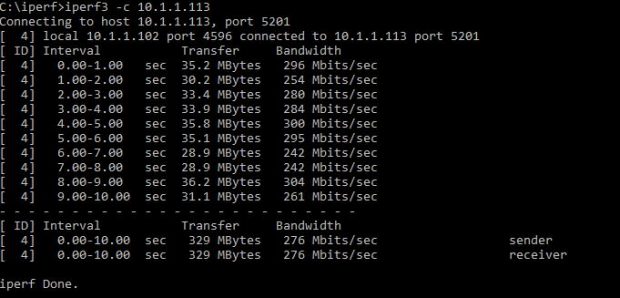
  • iperf used between my Windows 10 and linux box is showing between 170mbit/s and 220mbit/s which is in line with the Windows SMB copy

iperf3_1

update: iperf3 is showing ‘higher’ results now to max 300Mbit/s  .. but still not a 400 to 500Mbit/s I am expecting.

Of course I would like to fingerpoint towards Ubiquity’s  AP but I have seen that other AP’s can achieve higher results towards the Ubitquity’s AC Pro device

Of course specific settings like using VHT80 etc are set otherwise the connection speed could not achieve 1.1 or 1.3Gbit/s

So how to achieve a higher throughput speed, something I am seeking.

Anyone?

b.t.w. Altough speed is not everything, the wireless is absolutely stable !

Weatherstation and TE923 USB issues on a Raspberry Pi

I am using Weewx to read data from my weatherstation

But once in a while I have issues:

  • starting the driver / python app
  • after x days no data is being collected (and not being ftp-ed) and a restart does not function

I used the standard release of Weewx 3.5.0

Lucky there is a fanbase and group on google groups where  you can ask questions.

This weekend I upgraded my TE923 driver to  version: 0.18rc8. (meanwhile (22/7) this version is released as 0.18) This version can be found in the github repository and it seems to me that this version is solving some issues I had, but at time of writing I am still testing.

With this new driver I had also to make some changes to that driver and to my Raspberry Pi.

  1. I modified the TE923 Python driver: I commented this line out:
     self.devh.reset()

    (somewhere around line 1530, this caused the message that the USB part was not being claimed by python. (in previous driver versions this was not being reported, so it has to be something in the driver causing this. By commenting this line out, it is making sure that there is no ‘fake reset’ of the usb part. (Note: I did not test what will happen if I am using this line again in combination with the 2nd modification / addition I made).

  2.  and I found a special line for the Raspberry Pi to init the USB for usage with the TE923 driver:

sudo nano -w /etc/udev/rules.d/99-te923.rules

add this line:

ATTRS{idVendor}=="1130", ATTRS{idProduct}=="6801", MODE="0660", GROUP="plugdev", RUN="/bin/sh -c 'echo -n $id:1.0 > /sys/bus/usb/drivers/usbhid/unbind'"

and save it
with

udevadm control --reload-rules
you reload the settings

now stop / start weewx again (/etc/init.d/weewx start / stop / start etc..

Update: 1 week after I wrote this the weatherstation stopped responding again ..
Cause: the SD card had no space left.
here a tip: if you use raspbian, make sure your whole SD card is being used. My Linux install was not extended with the option in the raspbian config. This options allows you to use the whole SD card size

use raspi-config and use the option to expand the filesystem


Update 2:

Server has more than 51 days of uptime… and still running smooth

Update 3:

Server is now up for 147 days. Due to some own power stuff and relocations I had to stop it for a while
but still happy that it is running smootly


HP Microserver Gen8 G1610T booting with USB & ODD

I have 3 4 HP Microservers and 2 3 of them are running OpenMediaVault

I want to use the 4HDD’s of the Microserver soley as Data disks and not the OS. For this you have options:

Boot from SD card, boot from USB (internal) and than use the Datadisks. The problem here is that it is not wise to have many write actions to a SD card or USB thumbdrive.

To solve this issue: I use an old 2,5″ HDD connected to the ODD port. (ODD power cable & internal free SATA port)

To be able to boot from the 2,5″ HDD you need a number of items

  1. Sata Cable
  2. OKS-38523 (SATA Floppy Cable)  (€ 3,99)
  3. USB Thumbdrive (preferred 2 if you do not use a SD card)
  4. 2,5″ HDD (or SSD)

Size, in this, does not matter.

First connect the hardware (cables & HDD), do not insert the SD card or USB thumbdrive, do not insert the 4 Data disks (SATA) yet.

Make sure you use AHCI mode for the disks, the RAID module of HP cannot be used.

Install the OpenMediaVault ISO on the SD card, than make sure in the BIOS of the HP Microserver you can boot from it when starting the device. Insert the SD card in the slot and boot, install Openmediavault, it will detect the 2,5″ HDD

After installation: remove the SD card, Openmediavault will boot. Please remember: the 4 DATA disks are still not inserted. If you do so: OpenmediaVault will not boot, insert the USB Thumbdrive to the internal USB port.

Make sure that SSH is enabled within OpenMediavault or that you have access to the shell.

Below installation is derived from this german manual

in the GUI of OMV you can find the installation point of the USB drive, in my situation: /dev/sdb

Clean the disk with the command:
dd if=/dev/zero of=/dev/sdb count=1000

Make a bootable partition (very important to make it bootable in the interface !!)
cfdisk /dev/sdb

and do format it. (I formatted it as ext3)
mkfs.ext3 /dev/sdb1

mount /mnt /dev/sdb1
update: it is possible that your new debian version need to mount the device as ‘mount /dev/sdb1 /mnt’
I had this issue when I was installing OMV 4.x (updated: 11-04-2018 /dd/mm/yyyy)

Install grub:
grub-install –no-floppy –root-directory=/mnt /dev/sdb

Please note (when printing this: before no-floppy is dash dash (- -) (same for root-directory) and there is a space after /mnt[space] /dev/sdb

Find the device.map in /mnt/boot/grub, it is possible that you do not have it, than read further. cause than this part does not apply. (with latest debian installations it is not necessary anymore). But in my initial OMV 3.x installation I had. So If you have a device.map check the boot order:

(hd0)   /dev/disk/by-id/ata-Samsung_HDD_840__500GB_S3C6NSBD57N
(hd1)   /dev/disk/by-id/usb-_FreeCom_Memory_05B209083439BC14-0:0

Make sure you switch the boot order
(hd0)   /dev/disk/by-id/usb-_FreeCom_Memory_05B209083439BC14-0:0
(hd1)   /dev/disk/by-id/ata-Samsung_HDD_840__500GB_S3C6NSBD57N

Activate Grub:
grub-install –root-directory=/mnt /dev/sdb

Please note (when printing this: before root-directory there is a dash dash (- -) and there is a space after /mnt[space] /dev/sdb

grub-mkconfig -o /mnt/boot/grub/grub.cfg

Turn off the device, insert the 4 SATA disks and boot

01-08-2016 I’ve updated the info after noticing a missing mount and the dashes and spacing was hard to see when printing this ;-)

Registering VMX (Virtual Servers, VMWARE) after messing up ESXI

My Esxi host was messing with me

Some virtual servers where unregistered due to, I dunno. Even after reboot the vmware server lost all its config settings. SSH login password was gone, network was gone ..

So after going back to factory defaults within the GUI I restarted the device, loaded the license key and I saw that all VM’s were gone ..

With following command I got them, one by one, back

vim-cmd solo/registervm /vmfs/volumes/datastore_name/VM_directory/VM_name.vmx

if there is a space in the VM_directory escape it by using “VM_directory” (use quotes)