rev1.
find here nzbget + nzbgetweb (latest beta release) in a ‘Zeroday’ installation package
it 98% complete. Missing some documentation only.
Here the quick guide:
What do you need?
rev1.
find here nzbget + nzbgetweb (latest beta release) in a ‘Zeroday’ installation package
it 98% complete. Missing some documentation only.
Here the quick guide:
What do you need?
[this how-to is outdated !!!, You can use http://www.aroundmyroom.com/2009/11/14/just-a-howto-for-a-tweaker/
Simple how-to to use NFS together with the Conceptronic CFULLHDMA and Conceptronic CH3SNAS, a Full HD Mediaplayer & Network Storage device.
if NFS is abacadabra for you and you have no knowledge of Linux: do not worry, than this feature is not your thing.
NFS is mainly used for sharing data between Linux < – > Linux systems. NFS is a good way for quickly accessing data on a ‘local’ device.
So for the CFULLHDMA it means that we make the CH3SNAS part of the CFULLHDMA by ‘creating’ a folder in the file system of the CFULLHDMA with all the content available from the CH3SNAS.
First of all make sure you are using latest “Fun_Plug” on the CH3SNAS. I have used 0.5 which is working together with the 1.04a1 firmware (I used for my test). Copy the 2 files (see info at Fonz’ page) in the Volume_1 and reboot. The installation was successful if you see the FFP folder.
Download and use Putty (telnet client) and enter the shell of the CH3SNAS, for quick enabling UNFS3 User-Space NFS Server you use following command:
sh /mnt/HD_a2/ffp/start/unfsd.sh start
There is also nfsd.sh available, but probably due to some configuration settings in the firmware of the CH3SNAS it did not work, so preferred startup command is the above one.
You can edit your fun_plug by adding above command, after a reboot NFS is automatically started again. (Preferred).
Now you have to configure your NFS share in the CFULLHDMA. To be honest: this is very very simple when you do it by your webbrowser ;-) using the remote is possible if no pc or keyboard is available. Good luck ;-)
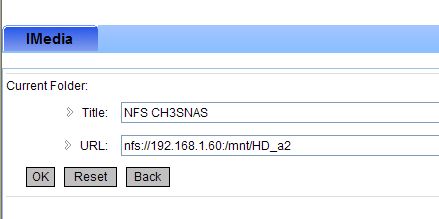
Next: create a new station. Enter a Name ie. NFS CH3SNAS

and the most important part is the URL to enter. By default the EXPORTS file of the CH3SNAS is sharing all folders, so pointing to the root is all you need to do.
nfs://192.168.1.60:/mnt/HD_a2
Press OK and your NFS share is saved.
Press the IMEDIA button on your remote or select it from your main menu, Select My Media, your NFS CH3SNAS is available now, select it and you will directly enter the Root (Volume)1 of your CH3SNAS