Update: Boot from USB with HP Microserver Gen8 and OpenMediaVault

Only usable if you use OMV with HP Microserver Gen8 where you cannot boot from a ODD disk (connector) and inserted HDDs in RAID)
Today, a day before my holiday (murphys law). I noticed that suddenly a samba share was not responsive anymore and that OMV was running in read-only mode.

A quick scan showed first a 2,5″ HDD failure (the disk where OMV is on) and a second scan showed that the USB flash drive with grub (this starts OMV) was not accessible anymore.  (probably caused due too high temperatures last week).

The RAID installation with 4 HDDs was expected to be ok.

So I grabbed a new flash drive, and a new 2,5″ 500GB disk (I had those laying around especially for this purpose). a bootable SD card with OMV 4 was also present

Steps:
1. change the 2,5″ disk (remove the failed one and connect the new disk)
2. insert the SD card, boot and OMV splash screen should be shown, install OMV on the 2,5″
3. After reboot insert the USB flash drive after OMV is booted
4. my USB drive is /dev/sdb
5. clean the flash drive
dd if=/dev/zero of=/dev/sdb bs=512 count=1
6. fdisk the flash drive as a bootable linux drive:
I believe the sequence as:
fdisk /dev/sdb
> n
> p
> 1
<enter this>
> a
(toggles boot flag)
>w
write this 

7. format the drive: mkfs.ext3 /dev/sdb1 (please notice the 1 !!, not using this issues with grub !! (Message to self)
8. mount the drive with mount /dev/sdb1 /mnt
9. grub-install –no-floppy –root-directory=/mnt /dev/sdb
Please notice that it is used: dash dash no-floppy dash dash root-directory
10. grub-mkconfig -o /mnt/boot/grub/grub.cfg

Message to self: if there is any issue reported in the screen about ext2, or about blocks .. no correct installation and usage of grub and your system will not boot


Solving my NFS issue

Suddenly …. after hours of thinking, analyzing .. I’ve found it … Yeah …

If the DNS IP address within the CH3SNAS is equal to the gateway address it will NOT work (or sometimes work).

Your router will forward DNS stuff, so normally the IP address of the router can be given as DNS server .. but on NFS level it is causing issues.. No idea why ..

It took me a lot of patching and I needed a lot of settings to be changed but as well as here in my office as at home both parts are working the fullest now…

Phew.. Thanks for everyone commented… maybe maybe this is helpful for someone outthere ..

Trying to understand: CH3SNAS & NFS = Help needed !

I’ve written earlier a simple howto for users with a CH3SNAS to work with NFS. UNFS is a user space implementation of the NFSv3 protocol. This is working flawlessly on the CH3SNAS with various Linux PC’s I am running (CentOS, Debian, Linux Embedded device etc.. )

but for a VMware implementation I need the READDIRPLUS procedure which is not available in UNFS. So I need to run Kernel-NFS on the CH3SNAS

Fonz fun_plug is providing Kernel NFS (enabled in the CH3SNAS) and UNFS. Installation is easy and almost fool proof.

The issue is following: on all my linux boxes (CentOS, Debian etc.. ) I get following message:

mount: mount to NFS server ‘192.168.1.60’ failed: timed out (retrying).

  • rcpinfo -p 192.168.1.60 gives all correct info
  • showmount -e 192.168.1.60 gives all correct exports
  • rpcinfo -u 192.168.1.60 gives:

program 100005 version 1 ready and waiting
program 100005 version 2 ready and waiting
program 100005 version 3 ready and waiting

  • Showmount -a 192.168.1.60 gives the mount points I ‘tried’ to use:

All mount points on 192.168.1.60:
192.168.1.100:/mnt/HD_a2

and even syslogd gives on the NFS server (CH3SNAS):

Jun 12 18:33:07 DEVELOPMENT daemon.notice mountd[1868]: authenticated mount request from 192.168.1.100:615 for /mnt/HD_a2 (/mnt/HD_a2)

  • Portmap is running at server and client!!

I am totally not understanding why I get time-outs. I do not have a firewall, I do not use iptables. Today I tried in another environment the same: always the error:

mount: mount to NFS server ‘192.168.1.60’ failed: timed out (retrying).

suddenly here at home after about 20 minutes trying to mount the NFS share, the NFS server has been mounted on my local system. But when umounting and mounting again I have again same situation. In my work environment it was totally not possible (standard Debian setup and a CentOS configuration) to have the NFS share mounted. Although it is similar setup ..

So although al tools tells me that everything is correct: I am not getting any mount :-(

Is there anyone with enough NFS knowledge who can tell me why the NFS share is not mounted?

CFULLHDMA & CH3SNAS: Using NFS

Simple how-to to use NFS together with the Conceptronic CFULLHDMA and Conceptronic CH3SNAS, a Full HD Mediaplayer & Network Storage device.

if NFS is abacadabra for you and you have no knowledge of Linux: do not worry, than this feature is not your thing.

NFS is mainly used for sharing data between Linux < – > Linux systems. NFS is a good way for quickly accessing data on a ‘local’ device.

So for the CFULLHDMA it means that we make the CH3SNAS part of the CFULLHDMA by ‘creating’ a folder in the file system of the CFULLHDMA with all the content available from the CH3SNAS.

First of all make sure you are using latest “Fun_Plug” on the CH3SNAS. I have used 0.5 which is working together with the 1.04a1 firmware (I used for my test). Copy the 2 files (see info at Fonz’ page) in the Volume_1 and reboot. The installation was successful if you see the FFP folder.

Download and use Putty (telnet client) and enter the shell of the CH3SNAS, for quick enabling UNFS3 User-Space NFS Server you use following command:

sh /mnt/HD_a2/ffp/start/unfsd.sh start

There is also nfsd.sh available, but probably due to some configuration settings in the firmware of the CH3SNAS it did not work, so preferred startup command is the above one.

You can edit your fun_plug by adding above command, after a reboot NFS is automatically started again. (Preferred).

Now you have to configure your NFS share in the CFULLHDMA. To be honest: this is very very simple when you do it by your webbrowser ;-) using the remote is possible if no pc or keyboard is available. Good luck ;-)

http://[ip-address]:49152/web/IMedia

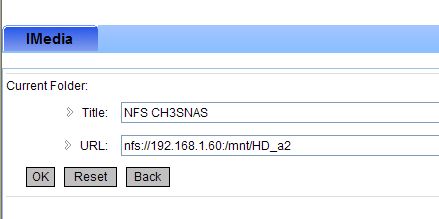
Next: create a new station. Enter a Name ie. NFS CH3SNAS

and the most important part is the URL to enter. By default the EXPORTS file of the CH3SNAS is sharing all folders, so pointing to the root is all you need to do.

nfs://192.168.1.60:/mnt/HD_a2

Press OK and your NFS share is saved.

Press the IMEDIA button on your remote or select it from your main menu, Select My Media, your NFS CH3SNAS is available now, select it and you will directly enter the Root (Volume)1 of your CH3SNAS

How to mount the CH3SNAS in your Linux System

A few firmware versions ago Conceptronic enabled the NFS kernel module in their CH3SNAS. With the help of Fonz’ fun_plug version 0.4 and it’s NFS addons you can easily mount the CH3SNAS into your Linux System

  1. Download Fun_Plug version 0.4
  2. Install the package and reboot the CH3SNAS
  3. Download NFS Utils
  4. Download Portmap
  5. Download unfs [not necessary for CH3SNAS]

put the 3 files in the root of the CH3SNAS

unpack the files with tar -xzvf [package name] the files will be put in the correct folders now.

Update: above way is not the correct way: you should use funpkg.sh from the fun_plug tools.

You can see the correct installation if nfsd.sh and unfsd.sh are is in the fun_plug start folder /mnt/HD_a2/fun_plug.d/start

Make sure the files can be started during reboot (or boot) by chmodding them:

chmod +x nfsd.sh

chmod +x unfsd.sh

Reboot your device

Go to your Linux System and create a folder where you want the CH3SNAS share to appear. I want to share my Volume_1 and put it in /home/backup/ch3snas. My command to correctly mount the Conceptronic CH3SNAS is:

mount [device-name or device-ip]:/mnt/[path to folder] /target/ folder/linux system

For example:

mount 192.168.1.60:/mnt/HD_a2 /home/backup/ch3snas

you can check now the contents of /home/backup/ch3snas by doing a ls -l for example