Moving VMWARE VM to Proxmox: The steps to follow

first download the OVFtool from VMARE and make sure you put the ‘bundle’  file on your Proxmox host. I used: VMware-ovftool-4.4.0-15722219-lin.x86_64.bundle

Make sure  sure the prerequisites of ovftool are present on the proxmox host
apt install libncursesw5

This file could be needed (I saw somewhere that someone had an error missing this dependency), so I installed it.

than make sure the VMWARE-ovftool can be executed so chmod it to ie. 755

install it with ./VMWARE-ovftool-xxxx
after the installation is finished it will tell you that it has been installed correctly

Than follow the following steps:

  1. ovftool vi:root@[vmware-machine]/[name-of-vm] .
    This will download the VM onto your Proxmox host
  2. qm importovf 200 [name-of-vm].ovf local-zfs
    this will convert your VM to Proxmox and put it on (in my case) local-zfs
    when ready you need to add a network card to the hardware in Proxmox, as this is not transferred from VMWARE
  3. Add the vmxnet3 driver for network in Proxmox
    boot the machine and login.

check the ensXX where XX can be different from VMWARE, so change it (easy to be seen with the command ‘ ip address ‘

change it to the correct new number in the file: /etc/networking/interface
shutdown machine again and reboot

VM is being converted from VMWARE to Proxmox

NB. I used Proxmox 6.2-10 with their ISO on a HP Gen8 MicroServer (Community Edition)

Het maken van een Timelapse en deze dan automatisch naar Youtube posten

Voor ons huis wordt een appartementen  complex gebouwd: Het Quadrant in Apeldoorn aan de Laan van Zonnehoeve nabij Station de Maten. Omdat ik als nerd en geek het interessant vind om te kijken wat er nu allemaal gebeurd heb ik een Unifi Flex G3 camera opgehangen die uitkijkt op de bouw van dit nieuwe complex. In de achtergrond is momenteel de sloop van de Americahal te zien

Elke x seconde wordt er 1 foto gemaakt en deze foto’s worden 1 keer per dag achter elkaar gezet en er een video van gemaakt. Zo wordt elke dag in 3 minuut en 51 seconden samengevat. Daarnaast wordt er ook elke vrijdag een timelapse gemaakt die het begin van de bouw tot het huidige moment bijhoud. Deze video wordt uiteindelijk ongeveer 15 minuten lang (afhankelijk hoe lang de bouw duurt)

Kijken? Zie hier het youtube kanaal

Alles is automatisch ingesteld. Dus zolang alles het maar blijft doen wordt alles automatisch gedaan. Ik hoef niets te doen.

Wat wordt er dan exact gedaan?

  • Elke X seconde wordt er een JPG image opgeslagen op een Virtuele Linux Server
  • Elke dag om 15.00 wordt er een timelapse gemaakt van de foto’s van een dag daarvoor
  • Tezamen met een rechtenvrij stuk muziek wordt de video gemaakt
  • Om ongeveer 15.45 wordt elke dag deze video naar Youtube geupload
  • de 24 uur worden in 3 minuut en 51 seconden samengevat, je kan dus zo elke dag even kort zien wat er op de bouwplaats is gedaa
  • Elke x minuut wordt er ook nog een 2e foto genomen. Deze wordt op een andere locatie op de Virtuele Linux Server opgeslagen en gebruikt om een een 2e timelapse te maken
  • Zo wordt elke vrijdag om 08.00 een timelapse gemaakt om zo een video te krijgen die de gehele bouw van start tot eind volgt.

Wat is er gebruikt om dit mogelijk te maken

  • Unifi Flex G3 camera (IP)
  • Linux Server
  • Timelapse script
  • Youtube Upload script via API
  • een NAS om de fotos op te slaan. NB: de dagelijkse fotos worden verwijderd nadat er een timelapse is gemaakt. Alleen van de ‘wekelijkse’ timelapse om zo de gehele bouw te volgen worden voor een langere tijd opgeslagen
  • Crontab instelling om de gegevens automatisch te verwerken
  • 1 zondagmiddag gebruikt om dit op te zetten


Using Mail-in-a-box with Rsync ssh backup on a different port

Mailinabox has an option to send backups over rsync to a system. Default through port 22. Many users who want to store backups of mail in a box need a different SSH port other than 22, a change can be made

go to /mailinabox/management

nano -w backup.py

find line 17 to 20 what starts with:

rsync_ssh_options = [
“–ssh-options= -i /root/.ssh/id_rsa_miab”,
“–rsync-options= -e \”/usr/bin/ssh -oStrictHostKeyChecking=no -oBatchMode=yes -p 22 -i /root/.ssh/id_rsa_miab\”,
]

In my setup I have to make sure the first ssh-options line is not active so put a # in front of it

Than make sure you change the -p 22 rsync option to the -p xxxx option where your SSH rsync is running. Unfortunately this cannot be set through the admin gui.

Notice: when updating mail in a box your first need to do following:

go to ./mailinabox

enter: git stash so that your changes are accepted by git and can be overwritten again. After the upgrade of mailinabox you have to make this change again.

Update: Boot from USB with HP Microserver Gen8 and OpenMediaVault

Only usable if you use OMV with HP Microserver Gen8 where you cannot boot from a ODD disk (connector) and inserted HDDs in RAID)
Today, a day before my holiday (murphys law). I noticed that suddenly a samba share was not responsive anymore and that OMV was running in read-only mode.

A quick scan showed first a 2,5″ HDD failure (the disk where OMV is on) and a second scan showed that the USB flash drive with grub (this starts OMV) was not accessible anymore.  (probably caused due too high temperatures last week).

The RAID installation with 4 HDDs was expected to be ok.

So I grabbed a new flash drive, and a new 2,5″ 500GB disk (I had those laying around especially for this purpose). a bootable SD card with OMV 4 was also present

Steps:
1. change the 2,5″ disk (remove the failed one and connect the new disk)
2. insert the SD card, boot and OMV splash screen should be shown, install OMV on the 2,5″
3. After reboot insert the USB flash drive after OMV is booted
4. my USB drive is /dev/sdb
5. clean the flash drive
dd if=/dev/zero of=/dev/sdb bs=512 count=1
6. fdisk the flash drive as a bootable linux drive:
I believe the sequence as:
fdisk /dev/sdb
> n
> p
> 1
<enter this>
> a
(toggles boot flag)
>w
write this 

7. format the drive: mkfs.ext3 /dev/sdb1 (please notice the 1 !!, not using this issues with grub !! (Message to self)
8. mount the drive with mount /dev/sdb1 /mnt
9. grub-install –no-floppy –root-directory=/mnt /dev/sdb
Please notice that it is used: dash dash no-floppy dash dash root-directory
10. grub-mkconfig -o /mnt/boot/grub/grub.cfg

Message to self: if there is any issue reported in the screen about ext2, or about blocks .. no correct installation and usage of grub and your system will not boot


Letsencrypt wildcard renew on non api DNS

./acme.sh –issue -d *.domain –dns –yes-I-know-dns-manual-mode-enough-go-ahead-please
./acme.sh –renew -d *.domain –yes-I-know-dns-manual-mode-enough-go-ahead-please

issue – add special key to domain dns provider (TXT record: _acme-challenge.[domain]
than renew the key (2nd command).

I use it with apache and in the ssl conf I direct to the location where the cert and key is saved

Rsync config with MailinaBox gives: invalid literal for int() with base 10: ” message

Mail in  a Box (mailinabox) can backup its mail with rsync to a destination of your choice. When it was working but your target backup machine has been changed suddenly mail in a box comes with the message: invalid literal for int() with base 10: ”

You checked, double checked your settings and they are all ok .. but still the above message. The reason is that Mail in a Box keeps a record of your SSH keys to protect itself:

messages like:  WARNING: POSSIBLE DNS SPOOFING DETECTED!  and

The ECDSA host key for [my.box.org]:22 has changed,
and the key for the corresponding IP address [target.ip]:22 has a different value. This could either mean that DNS SPOOFING is happening or the IP address for the host and its host key have changed at the same time. Offending key for IP in /root/.ssh/known_hosts:7

Normally this is good behaviour but now you need to have fixed this: its easy with this command
ssh-keygen -f “/root/.ssh/known_hosts” -R [my.domain.name]:port


Backup MIAB (Mail in a Box) through Rsync towards Openmediavault Server

Mail in a box (MIAB) has a backup feature available. It stores full and incremential backups on the mailserver and it is possible to store the backup also on another device through RSYNC. In my situation I am saving the data to an OpenMediaVault NAS

Here I write my own: How I did it (quick and dirty cause I expect you to know things).

In short:
rsync over port 5678 to backup your data to the OpenMediaVault NAS

  1. Make sure you have a hostname available where rsync can be connected to, the hostname must point to the IP where the OMV (OpenMediaVault) is connected
  2. Rsync over SSH is being used.
  3. if you do not want to use port 22 with Rsync, you need to modify /root/mailinabox/management/backup.py line 19: change -p 22 to -p 5678
  4. Enable Rsync Server in the GUI (Grapical User Interface) of openmediavault.

Please note that it is not possible to use the ~/.ssh/config file where you can add the port as well. The reason is that the verification process needs in the backup.py a -p setting which is not overridden bij de config file.

  • SSH standard port 22, this we will change. (ie. port 22 is already in use towards another server)
  • In the router go to your portforwarding section and open port 5678 towards port 22 to your device (with OpenMediaVault).
  • MIAB and RSYNC needs to have the full path where to store the backup. In my situation: /media/a925efd7-ada5-48b5-80e6-383cc6274bcd/Backup (the folder must available and writable
  • Make sure that a user can login with SSH and can access OpenMediaVault
  • MIAB is providing a public key for auto-login needed for rsync. this key must be available in OpenMediavault. You can put the public key in: ~/.ssh/authorized_keys or in a folder in /var/lib/openmediavault/ssh/authorized_keys where you create a file with the name of the user
  • within MIAB you can use from /root/mailinabox/ the following: sudo management/backup.py –verif

to test if your public key is accepted: from MAIB ssh with the following command:  ssh -p 5678 -i /root/.ssh/id_rsa_miab user@domain.name

If this is giving you a direct login to your OpenMediaVault NAS you can use Rsync ;)

Missing something? Reply and ask


VLAN for Guests with Ubiquity: Unifi USG, USW8-150, AC-Pro, AC-LR and other stuff

This posts is merely an overview of what I did to get my WLAN guests, who access the Internet through the hotspot feature of the USG and the Unifi controller,through a VLAN so that they are not part of my own private network. (security)

This handout only applies when you own some gear of Ubiquity. (I have also other hardware, here you might have to make some configuration as well, my situation is explained.

What hardware is in the network
USG Router – US 8-150W switch – AC-Pro, 2 x AC-Lite AccessPoint (Unifi stuff)
1x TP-Link TLSG108E (Smart Switch)
2x Dump switch 5 port Netgear (not important in this story)
1x TP-Link TLSG2216 (Smart Switch)

1st Create a guest network with VLAN100. Do this only if you have the USG. If you do not have an USG this does not apply cause the network part in the controller is for use with the Unifi USG router.

If you use “Guest” it is already isolated from your corporate LAN.
Modify other settings like DHCP in this menu. This I do not explain.

Now make sure your SSID for your guests can be on a VLAN

This is the most important part.

Notice: I have an US-8-150W. When creating a VLAN Guest network in the profiles part of the controller the ports will be configured automatically. As long as you have all profiles accepted on the ports, the VLAN will directly work if your AccessPoint is directly connected to the Unifi Switch.

In my situation I have 2 AccessPoints behind a smart switch and 1 AccessPoint connected to a dumb switch what is connected to the US-8-150W (all devices eventually come to the US-8-150W as the uplink is the USG Router).

A simple test towards the AP connected to the dumpswitch is showing that the VLAN is working

To have the VLAN100 working towards the other APs you need to tag the ports in other smart swiches. In my situation 2 different TP-Link devices

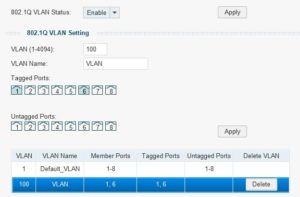
Tips for the TP-Link: TLSG108E: enable 802.1Q (no need to set the 802.1Q PVID setting)

In my example you see that port 1 and port 6 are tagged with VLAN 100. Port 1 is the uplink port towards the other switch (the unifi switch) and port 6 is the port towards the AccessPoint

Apply and save the configuration and your guests can access the guest portal over VLAN

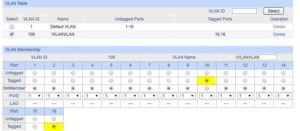
the TP-Link SG2216 is a business smart switch so the screens are a little different

Here you see the VLAN section of the SG2216 where I tagged port 16 (uplink port towards the Unifi Switch) and port 10 connected to the AccessPoint. Now this AccessPoint is also serving VLAN towards my Guests.

Maybe you wonder what will happen to your normal LAN clients when you enable or tag ports on VLAN100: your normal LAN is not tagged and the switches will forward your data normally.

Add route to Linux system to allow a VPN connection access the System which is behind a VPN ;)

Okay machine ‘I am behind a VPN’ can be accessed locally: 10.1.1.20, with OpenVPN it is behind an external IP address, not mine
I set up a VPN to my local network: 10.10.10.50 is my IP when I am behind a VPN, when I try to access 10.1.1.20 it is not allowed, where other machines in the same network are ok.
This is due to the OpenVPN connection being active (when disabling OpenVPN, than all is ok), so trying to be able to allow the remote VPN access the machine.

Now I did 2 things and I believe the first command did it.

1. used a new route:
ip route add 10.10.10.0/24 (VPN) via 10.1.1.100 (router) dev eth0

and I used
2. iptables -A INPUT -s 10.10.10.50 -j ACCEPT (but this one did not work, but I will mention it .. you never know)

Kodi and texturecache

There is a nice tool for updating your db (mine is MySQL) with a tool called texturecache

this info is for my own purpose if useful use it

Crontab in place

0 */2 * * * sh /home/kodi/kodiupdate.sh > /dev/null 2>&1

#!/bin/bashNAME=texturecache
INIT_DIR=/etc/init.d
echo “Start Scanning Video Library vscan”
/home/kodi/texturecache.py vscan
sleep 5
echo “Start Cleaning Video Library vclean”
/home/kodi/texturecache.py vclean
sleep 5
echo “Start update with qax”
/home/kodi/texturecache.py qax
echo “Start scanning texturecache with function C”
/home/kodi/texturecache.py c
sleep 5
echo “Prune data missing on disk P”
/home/kodi/texturecache.py P
sleep 5
echo “Start update with Xd”
/home/kodi/texturecache.py Xd
sleep 3
echo “Start update with ./texturecache.py R”
/home/dennis/kodi/texturecache.py R
sleep 3
echo “end”

Make sure that there is a connection with your “Master Kodi”
create a samba link in /etc/fstab ie. example
//192.168.1.115/Userdata/ /media/kodi cifs guest,uid=1000,iocharset=utf8 0 0
now the thumbnails can be saved correctly